How to Secure a Dog Crate in the Back Seat (Seatbelt and Strap Methods)
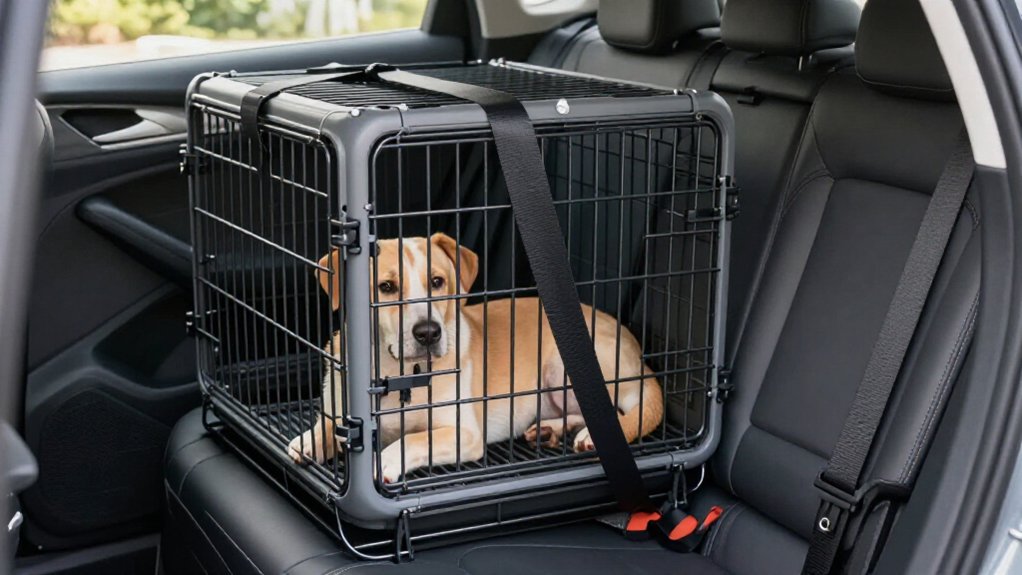
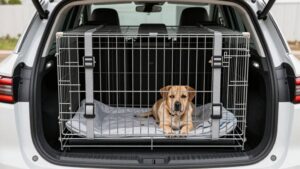
Place the crate on a back-seat side position behind a front seat, not in the middle. Check the crate and restraint ratings against your dog’s weight plus the crate’s, and use vehicle-approved anchors or a seat belt designed for this purpose.
Route the belt through approved crate handles, buckle it, remove slack, and tuck loose webbing away. Test for shifting, and check the latched door and strap condition before travel; the steps below help troubleshoot fit issues.
Back-Seat Anchor Points
Use only sturdy, vehicle-approved anchors, such as cargo loops or built-in hooks, designed to withstand crash forces.
Place the crate on the back seat behind a front seat, not in the middle, so the strap runs straight to an anchor and limits shifting during hard braking or swerves.
If your seat lacks suitable anchors, use an appropriate soft loop around a strong structural section; repeat the method around the crate as needed to prevent sliding or rotation.
Center the crate and align strap attachment points with the anchor, so the restraint pulls steadily rather than at an angle that encourages tipping.
Tighten the strap until snug, not over-tensioned, then confirm the anchor and attachment lock. Test for side-to-side and front-to-back movement; your crate shouldn’t shift freely.
Check Crate Weight Limit
A crate that fits your dog may still be overloaded. Check its manufacturer’s weight rating, and count your dog’s actual weight plus the crate’s weight; adequate dimensions don’t prove adequate capacity. Also verify your seatbelt or ratchet straps’ load rating, or confirm they’re designed for vehicle tie-down use.
A crash creates dynamic forces far beyond static weight: at 30 mph, an 80-pound dog can exert roughly 2,400 pounds of force.
- Choose a restraint rated to manage these forces.
- If your setup nears its limit, choose a sturdier crate or properly sized restraint.
- Overloading can increase shifting or deformation during braking.
- Recheck totals when you change dogs or add a mat, blanket, or water container.
A proper rating helps protect your dog without relying on fit alone.
Step 1: Clear Loose Seat Items
After examining the crate and restraint ratings, clear the back seat before you secure the crate. Remove loose items, bags, toys, blankets, and accessories, so they can’t shift into the kennel or become projectiles during hard braking. Check beneath and beside the seat for small objects such as rocks, coins, or phone cases. These can slide under the crate or snag the restraint route.
Keep the anchoring area behind the front seat clear, and ensure the belt path has no clutter, twists, fabric, or debris. A clear, flat surface helps the crate sit evenly and lets the belt work as intended. After clearing the seat, use a non-slip mat so the crate stays stable during turns and sudden stops. This helps protect your dog.
Step 2: Fasten the Seat Belt Buckle
With the back seat clear, place the crate flat and centered on a side seat, not the middle seat. Pull the seat belt around the crate’s length and buckle it securely. Check that the latch clicks fully into place with no gap; a partly engaged buckle can release or allow movement.
Confirm the belt locks and holds the crate with minimal slack. A locked belt helps limit shifting during turns, bumps, and hard braking, reducing the chance that the crate slides and frightens or injures your dog. Before driving, gently rock and pull the crate in several directions. It should stay firmly in place.
If the belt alone leaves too much slack or can’t hold the crate snugly, add approved safety straps as well.
Step 3: Thread Seat Belt Through Handles
Thread the seat belt through the crate’s built-in handles or loops to create an additional restraint path. Center the kennel on the back seat, not the middle seat. Guide the belt along the crate’s length and through the handle points, keeping it flat and untwisted.
Pair this route with a snugged retractable ratchet strap if you’re using one; both restraints should work together without pressing the crate out of shape. Tighten the belt until it’s snug, not excessively taut, so the crate stays still while its structure remains intact. Then push it from several directions. It should move only minimally and shouldn’t rack, lift, or rotate.
Recheck the setup after loading your dog, ensuring the restraint doesn’t obstruct ventilation or leave your dog uncomfortable.
Step 4: Lock the Buckle Into Its Receptacle
Once the crate is positioned on the back seat behind the driver, pull the seat belt around its length and click the buckle fully into its receptacle.
Check that the belt follows the crate’s intended path and lies flat. Feed it into the receptacle until you hear and feel it engage. Then tug the belt; it should remain locked rather than slip free.
This connection helps keep the crate secured during hard braking, freeway swerves, or low-speed impacts, when sudden motion could unbalance your dog. Keep your dog’s comfort in mind: don’t tighten the belt across your dog or obstruct ventilation. If you’re adding a retractable ratchet strap, secure this seatbelt first, so the crate has more than one restraint point.
Step 5: Eliminate Side-to-Side Crate Movement
To reduce side-to-side movement, place the crate flat and centered on the back seat behind the driver, not in the middle. This position helps limit rocking during turns and bumps. Put a non-slip mat or blanket beneath the crate to increase friction against the seat.
Run the seatbelt around the crate’s length, buckle it, and check that the belt locks; the belt should keep the crate from sliding left or right. If you’re using a retractable ratchet strap, attach one end to the crate and the other to a vehicle anchor point. Tighten it until snug, not excessive, so it limits lateral shifting without distorting the crate.
Choose a strap length suited to your crate size, and confirm the crate stays stable before travel.
Step 6: Tuck Away Excess Strap Length
After securing the seatbelt and tightening the ratchet strap until it’s snug, bundle and secure any extra webbing so it can’t hang near the buckle or seatbelt latch. First, make sure the seatbelt runs tightly along the crate’s length and its buckle is fully engaged. Then shorten the strap and tuck the loose end away from the anchor and latch; don’t leave slack between the crate and its restraint.
Keep the ratchet tension snug, not excessive, and bundle the remainder so it can’t swing or loosen when you brake or turn. Loose webbing can catch near the buckle, while unnecessary slack may let the crate shift or tip over bumps or during a swerve. Give the crate a quick tug: if it moves more than slightly, tighten the strap and tuck the excess again before driving. This helps keep your dog’s ride steadier without over-tightening the restraint for a calmer ride together.
Verify Crate Door Security
Before every trip, confirm the crate door is fully latched and locked, not merely closed, so it stays shut during hard braking or a sudden swerve. Give the door a firm hand shake; if you feel looseness or see a gap, reseat the latch or replace damaged hardware. Choose a positive-locking latch designed to resist movement, since crate shifting can strain weak closures.
Position the door away from pressure against the seatback or seatbelt strap; pressure could partly release the latch. Once you’ve secured the crate with the seatbelt or strap, check the door again. Tightening can alter alignment and affect engagement.
Don’t rely on a door that only appears shut: confirm the locking point engages fully before driving, so your dog remains safely contained.
Seat Belt Won’t Retract
Even with the crate door latched, a seat belt that won’t retract can leave the kennel unsecured. If the belt stops around the crate, feed it back slowly while keeping it taut, then re-thread it around the kennel so it can lock and hold tension. Confirm you’re using the correct latch for that seating position, and keep the seat upright as approved. Route the belt along the kennel’s length.
| Check | Action | Why |
|---|---|---|
| Latch | Buckle fully | Enables locking |
| Seat | Set upright | Supports retraction |
| Fit | Tighten snugly | Limits movement |
Before driving, tighten without excessive force and try sliding the crate by hand. If the belt won’t lock and hold, don’t drive with the crate resting on slack webbing. Use approved retractable ratchet straps attached to an anchor point or cargo-area tie-down instead.
Check Webbing for Frays
Check the crate strap’s webbing before every trip by running your fingers along it for frays, loose threads, fuzzing, or thin or dark worn spots.
Inspect the full length, especially where the webbing bends around the buckle or metal hardware. Cuts, pulled fibers, abrasion, stiffness, or a glossy, glazed surface can signal damage; heat or chemicals may weaken fibers, reducing strength under crash loads. Replace the webbing or entire strap immediately if you find any damage. Don’t rely on a knot or patch to restore its protective capacity.
Check the end loops and stitching, too: loose seams can fail under tension and let the strap separate. As you thread and buckle it, keep the webbing flat, without twists or kinks, which can concentrate stress. If anything looks questionable, use an undamaged strap before securing your dog for the ride. A secure fit helps protect your dog in a collision.
Conclusion
Before driving, confirm the crate is secured to approved back-seat anchors and within the vehicle’s weight limits. Remove loose items, buckle and route the seat belt through the crate’s designated handles, then stow excess webbing. Check that the door is latched and the belt retracts without twisting or slack.
Inspect straps for fraying, and don’t travel if any connection is damaged or unstable. A properly secured crate can reduce movement in a sudden stop, helping protect your dog and passengers.